
The Ultimate Guide to Making Perfect Macarons: A Deliciously Easy Recipe!
Are you ready to impress your friends and family with your baking skills? If you’ve ever wandered through a charming French patisserie, you’ve likely been captivated by the colorful array of delicate macarons. These delightful treats are not only a feast for the eyes but also a gourmet indulgence. In this post, we’ll dive deep into the world of macarons, clarifying the difference between macarons and macaroons, and share the best macaron recipe that will leave everyone craving more!
A Little History: The Rise of the French Macaron
Macarons have a rich history that dates back to the 16th century. Originally from Italy, they made their way to France when Catherine de’ Medici married Henry II. Over the years, these delicate meringue-based confections evolved to what we know and love today—crisp on the outside and soft and chewy on the inside. If you’re looking for the perfect dessert for birthdays, weddings, or any celebration, macarons are already a hit. Their versatility in flavors and colors makes them a favorite for anyone with a sweet tooth!
Ingredients
Before we jump into the instructions, let’s gather our macaron-making arsenal! Here’s what you’ll need for this easy macaron recipe:
For the Macaron Shells:
- 1 cup (100g) almond flour
- 1 ¾ cups (200g) powdered sugar
- 3 large egg whites (aged, if possible)
- ¼ cup (50g) granulated sugar
- A pinch of salt
- ½ teaspoon vanilla extract or desired flavoring (e.g., pistachio, raspberry)
For the Filling:
- 1 cup (227g) butter, at room temperature
- 2 cups (240g) powdered sugar
- 1 teaspoon vanilla extract
- Optional: Food coloring of your choice
Instructions
Now that you have your ingredients laid out, let’s jump right into the instructions to create these beautiful macarons!
Step 1: Prepare the Baking Sheets
Preheat your oven to 300°F (150°C). Line baking sheets with parchment paper or silicone baking mats—this is important for achieving that perfect macaron texture.
Step 2: Make the Macaron Batter
- In a bowl, sift together the almond flour and powdered sugar to eliminate any lumps.
- In a separate mixing bowl, whip the aged egg whites until foamy. Gradually add in the granulated sugar, continuing to whisk until you achieve stiff peaks. This can take about 5-7 minutes.
- Fold the sifted almond flour and powdered sugar mixture into the meringue using a spatula. Be gentle but thorough, and stop when the mixture flows like lava—about 30 folds.
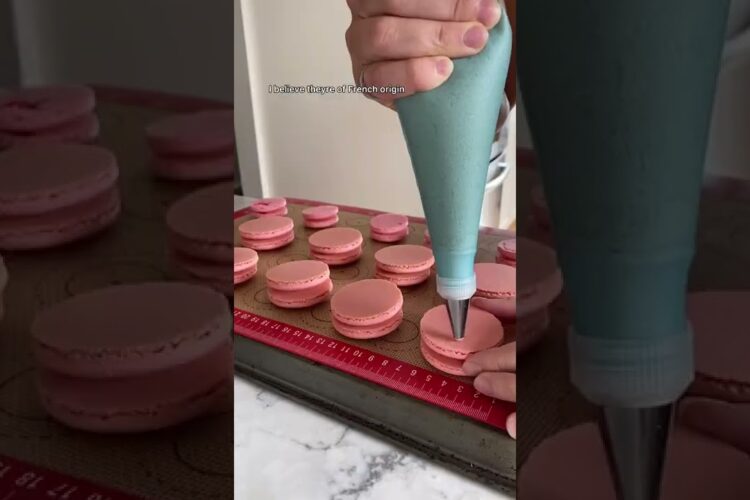
Step 3: Pipe the Macarons
Transfer your macaron batter into a piping bag fitted with a round tip. Pipe small circles onto the prepared baking sheets. Allow the macaron shells to sit at room temperature for about 30-60 minutes until they form a skin on the surface.
Step 4: Bake
Bake the macarons in the preheated oven for 15-20 minutes. Once done, they should lift easily off the parchment paper. Let them cool completely before filling.
Step 5: Make the Filling
While the shells cool, beat the butter until creamy. Slowly add powdered sugar and vanilla extract. Mix until fluffy and well-combined. If you’d like, add food coloring to achieve your desired hue!
Step 6: Assemble the Macarons
Once cooled, pair the macaron shells and pipe or spread the filling on one shell before topping with another. Voilà! Your macarons are ready to make their grand debut!
Tips and Variations
- Flavor Variations: Feel free to experiment! Try different flavors, such as lemon, lavender, or chocolate, to keep things exciting!
- Aging Egg Whites: If you have time, separate your egg whites and let them sit in the fridge uncovered for 24 hours. This helps improve texture!
- Storage: Keep them in an airtight container in the refrigerator for up to a week, or freeze them for later enjoyment.
Conclusion
Creating perfect macarons may seem intimidating, but with this easy macaron recipe, you’ll be well on your way to French pastry stardom! Share your colorful creations with friends and family, and don’t hesitate to experiment with flavors and fillings. Try it and let us know how it turned out! Happy baking!